LCD compatible NES/FC (Nintendo Entertainment System/Family Computer) light gun
The reviews on this site are the text versions of the videos on my YouTube channel. The text based reviews use (if at all) very little pictures. Please follow the link to the corresponding video in order to see in game graphics.
In episode 88 I showed Modern Mallard, which is a way to play Duck Hunt on LCD televisions. After releasing the video I was contacted by Aleksey Kovalevskiy who showed me that he did a similar project independently. He discovered that the particular NES clone console light gun he was using was somewhat compatible to his TV and that the problem that hindered him playing the game was just the lag introduced by the LCD monitor. He developed patches which account for the screen lag in the games Duck Hunt, Hogan’s Alley and Wild Gunman. They are available to the public at his website neslcdmod.com. They can be patched onto the original ROMs using a program called Lunar IPS.
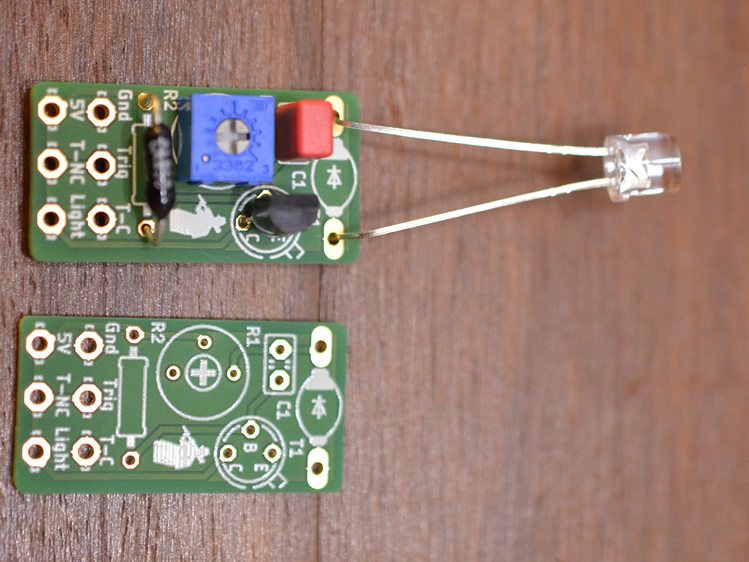
This project works because cheap NES clone system guns don’t filter for 15 kHz light signals, but pay attention to light in general. Every such gun I ever opened uses the same circuitry albeit having differently rated components. There are slight variations on how the trigger is treated and some circuits use an additional filter, but the light sensing portion remains the same. The modern Zapper clones which are sold by Retrobit and Tomee are no difference. I served as one of Aleksey’s beta testers. Sadly I wasn’t able to achieve compatibly to the cheap NES clone system guns I own. These guns would always hit the target, as long as they were facing towards a sufficiently bright area, independently of whether the actual target was in the line of fire. As part of my testing I bought the very same gun Aleksey is using, but sadly the problem remained. I decided to step into the issue electronically and took a closer look. I swapped the resistor which is located in front of the photodiode with a potentiometer in order to control the sensitivity of the gun. This method worked nicely for me and it is the solution I want to present in this video. While searching for the necessary resistance value I suggest either connecting the circuit to a big external potentiometer or when using a trim potentiometer to just close the gun with rubber bands rather than screwing it back together frequently. If the gun remains too sensitive the plastic lens can be removed to further attenuate the light signal. My modified NES clone gun did never work 100 % perfectly and still seldom had false negatives and false positives at hit detection. Furthermore the resistance sweet spot of R1 suffers of a hysteresis, which made me plan to change the internal trim potentiometer with a potentiometer in the gun handle which would be accessible from the outside.
Of course this whole modification is just necessary if your clone gun doesn’t work with your particular TV on your particular console out of the box. This solution is applicable to all simple NES clone system guns. Because very few components are necessary, it would be easy to build a bare wire circuit, or to make a stripe board version of it from scratch. However for people who prefer tidy circuitry I designed a PCB which I put on my website. People can download it for free there, etch it themselves or get it printed by a commercial printer service. Personally I did a whole new gun for this project using the shell of a toy laser gun from AliExpress.
I was able to do an interview with Aleksey in which I got to know more about the background of the project. I asked Aleksey how this project started and whether it was inspired by Modern Mallard. Aleksey told me that everything started around 2014 when he wanted to show his girlfriend Duck Hunt. To his misfortune he tried to show the game on a LCD screen. Lucky for us the used gun was responsive to the TV and he recognized that his sole problem was the lag. He started to search for information in the internet and wrote to the Nesdev forums. Sadly many of the responses were discouraging and not very helpful. Nevertheless Aleksey carried on developing his project. He learned how to hack NES ROMs by disassembling and reading existing ROMs. He heard about Modern Mallard when it launched the Kickstarter Campaign. When he saw the relatively small number of backers he decided that he wanted to distribute his patches for free. Before his NESLCDMOD project Aleksey never modified ROMs before. Nevertheless he successfully altered the firmware of his smart phone to account for a localization issue. As of writing this review Aleksey made three patches and is currently working on a fourth patch. I asked whether he is planning to carry on with his work in the future. He told me that he will continue as long as there is interest in the community. He is very motivated by the great feedback he received so far. As Aleksey is playing on a Dendy and is using a Simba’s gun rather than using a Zapper on a Nintendo Entertainment System I asked him whether he is planning to make patches for unlicensed games as well. He answered me that he just knows the official games so far, but that he is interested in patching other games as long they are good. I asked Aleksey whether he is playing light gun games other than the ones on the NES. He answered that he used to play Soviet Arcade games such as Winter Hunt and Sniper 2. I asked Aleksey whether he is also playing more current games besides the old classics the loves. He told me that he is a PC gamer and that he owns a PS4. When being asked about his favorite light gun and light gun game he told me that so far he just owned two NES clones system Beretta 92 guns. As a child he liked Hogan’s Alley very much. Today he likes many light gun games which offer a nice challenge. Generally he likes games with shoot/no shoot sceneries and he is looking forward to play Freedom Force once he completed his patch.
If you like this project I encourage you to support Aleksey as your support is what keeps him going. Write him a nice email, tell your friends about this project, write a comment to my YouTube video or support him monetarily. My acknowledgement goes to Aleksey for his NESLCDMOD project and for being so kind to do an interview with me.
PCB files
Here you can download my PCB file as Eagle file or GERBER file.
Print this with a thickness of 1.55 mm. Just use the layers top(1), bottom(16), pads(17), vias(18), dimension(20), tplace(21), bplace(22), holes(45), tStop(29), bStop(30).
Parts: R1 1 MΩ resistor; R2 0-10 kΩ trim potentiometer; C1 0.1 μF capacitor; T1 2N3902 NPN transistor; 5800B Photodiode.