Signal Generator (Namco "recoil" and Laser)
The reviews on this site are the text versions of the videos on my YouTube channel. The text based reviews use (if at all) very little pictures. Please follow the link to the corresponding video in order to see in game graphics.

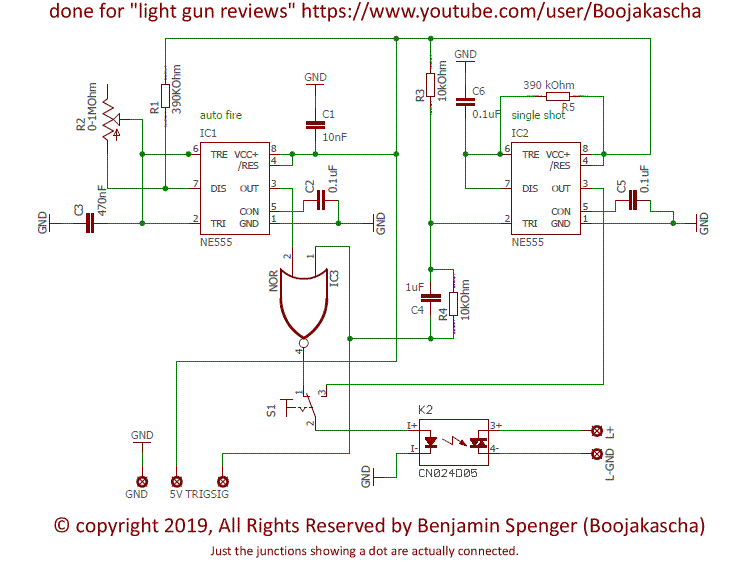
For two of my ongoing projects I needed a special signal generator. One is concerning a beat up broken Namco arcade gun, which I restored and now give Guncon 1 and 2 compatibility. These guns contain a solenoid valve which moves the slide for the force feedback. I wanted this slide to cycle, but not to stay back if I keep the trigger pulled and I wanted a full auto setting that keeps the gun cycling in the same situation. Out of the G-con 45 shell for this project I did my Steam Gun which I showed in episode 109. I am using the G-con 2 shell of this project for a custom IR laser gun to use with flash games as shown in episode 96. The laser driver for this project is the other use case for my signal generator.
When I started my research I saw in the Aussie Arcade forum that a user called mR_CaESaR already did a magnificent job, turning a Namco Arcade gun into a console gun. He went through multiple design revisions and ended up using schematics from a Shmups forum user called Synthax. I made a PCB based on the most recent schematic Synthax did, but sadly I never got it to work.
I decided to come up with a whole new design specifically tailored to my needs. I used a red laser to do so during the planning stage to ease matters up. I figured out what I needed to know on a prototype and drew a new PCB. The switch selects between single fire and full auto fire. The potentiometer allows the user to control the signal frequency during full auto mode. My personal design isn't perfect by any means, as under certain criteria single shots sometimes won't be registered for the recoil. My main goal however was avoid getting interferences into the gun, as this would decrease precision. I achieved this and overall I am very satisfied with the result. The switched higher voltage, be it for a solenoid valve or a laser is 100 % separated from the controller PCBs.
With this stepping stone done, I am ready to continue with the two projects. Each of them will receive a dedicated video upon conclusion. As usual I publish the PCB files here. This way interested people can print one themselves and use it for their projects. People may distribute these PCBs for the cost of materials. If you plan to sell them for a profit, contact me.
Print this with a thickness of 1.55 mm. Just use the layers top(1), bottom(16), pads(17), vias(18), dimension(20), tplace(21), bplace(22), holes(45), tStop(29), bStop(30).
Parts: R1: 390 kΩ; R2: 0-1 MΩ potentiometer; R3: 10 kΩ; R4: 10 kΩ; R5: 390 kΩ; C1: 10 nF; C2: 0.1 μF; C3: 470 nF; C4: 1 μF; C5-6: 0.1 μF; IC1-2: NE555P timer; IC3: NOR gate NC7SZ02M5; S1: SPDT switch; K2: SSR Crydom CN024D05
